Monthly Archives: March 2012

Quilts Plus at Baldwin County Historical Museum Tour


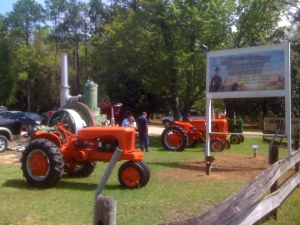
Today I joined my DH for a trip to the Baldwin County Historical Museum in Elberta, Alabama.  There was a German Sausage Festival going on in Elberta, a town settled by a large number of Germans many years ago.  The Sausage Festival occurs twice a year,  Spring and Fall.  It is so popular that you have to go early and get your sausage early as they run out most years.  We went to the festival last year.  This year, the Southern Alabama Antique Tractor and Small Engines Club was asked to go to the Historical Museum to draw attention to the Museum on the day of the Sausage Festival.

The Museum is about 1/2 mile from the location of the Sausage Festival and is a gem hidden back in the trees.  Like the pearl found in the ugly shell of  Coast oyster, the museum is hidden from plain view by its plain building.  Parking six or eight antique tractors, all colorfully restored to their original colors, draws the needed attention to the Museum.

In the foreground is our  1950 Allis-Chalmers WD tractor restored to its original state and color, AC Orange.


I don’t usually accompany DH to his tractor events but last year he had been there and took a few quilt photos that had me anxiously waiting for the day I’d go see them in person.  I was NOT disappointed.  There were many quilts and many sewing machines plus lots of other good things to see.  The day went by quickly and I was indoors in air conditioning for most of this sultry southern day.

I know you want me to share with you some of the things I saw.   There were some firsts for me in this museum and maybe for you. Let’s begin.

When we arrived, one room was full of musicians. They played steadily from 10 a.m. to noon; dulcimers, mandolins, guitars, fiddles, recorders, an occasional harmonica and I probably left out some things.  Here’s one Southern gentleman still hanging on to his Confederate roots.


I enjoyed the music, folk and gospel mostly but I was waiting for them to vacate the room so I could examine the four quilts hanging on the wall behind them.


One of the four on the wall, all done by the Elberta Arts and Crafts Club around 1950, they were all expertly appliqued and hand-quilted.  That’s the state of Alabama in the center.  Elberta is located way down in the lower right hand corner where you see some lines.(near the  whale)


Second of the four, this one shows various livelihoods practiced in the early days of Elberta’s history.  Oystering, logging, farming, pecan trees, fishing, shrimping all are depicted here.


Third on the wall, this shows some of the farmsteads and crops that yielded a healthy crop and a good income for the early settlers of Elberta, AL.


These quilts were worth waiting for!!  They were so well done.  I love the view from above the countryside (center of the quilt above).

To go with these four lovely applique quilts, I moved into another room to enjoy the antique sewing machines and other items.  Come with me to see some of them.


This basket quilt, done all in brown/tan/white baskets on a royal blue background is lovely.   This is a very typical 1800’s quilt block.  I think the use of the browns/tans and whites is a bit unusual.  Most I’ve seen have been done in pastels.  I love the hand quilting pattern.


The card accompanying this quilt states it was made by an Emma Holland in the 1880’s and was gifted and handed down three times before it was sold by the fourth owner to get money to move her mother to Texas.


Do you suppose it might have been pieced on this treadle machine?


Or this one?


This is a very rare sewing machine.  It was the first that allowed fabric to be fed under the needle and used a straight needle.  It was developed and patented by a Mr. Wilson.  Mr. Wilson later was joined by Mr. Elias Howe and Mr. Singer.  They eventually joined together in a Sewing Machine Combination and were able to use each other’s patents to continue the progress in development of the sewing machine.


I have seen this pattern before but can’t think of what it’s called.  Well done, don’t you think?


This seems like a rather small washtub for washing a full size quilt, am I right?


A utilitarian crazy quilt, tied rather than quilted.  All types of fabric could be used in these crazy quilts.  Wools and linsey-woolsey, cottons, feed sacks all were used.  Satins and velvets were used for more special quilts.


Quilting wasn’t the only needlework done by the 1900’s woman.  Here are some things to remind us of how “the more things change, the more they stay the same”.


Wooden clothespins with this lovely hand embroidered clothespins bag.


Hankies with tatted edging.


Basket of star blocks….and we’re still fascinated with star blocks!


Button, button, who’s got the button?   Bone buttons.  They don’t make them like they used to!


Sewing basket, drop spindles, more


Early apron pattern


Feedsack fabrics – for quilts, dresses, and aprons


A version of a “Grandmother’s Fan” block?


Weaving looms


Do you enjoy your Rowenta iron?  Have a favorite iron because it heats up fast, gives great steam and is lightweight to handle?  Consider yourself very fortunate.  Check out these early irons.


Charcoal Iron  – Hot charcoal was put into the interior of the iron to heat it for use.  That’s sounds like a burn waiting to happen!  And yet, it gets worse!


Kerosene Iron   That little canister of kerosene……yikes!


I remember my grandmother having a cast iron that sat on the back of her wood stove staying hot for whenever she decided she wanted to iron her aprons.  She always had three or four of the hot irons sitting on the back of the stove.  I remember her always wearing a crisp, freshly ironed apron.  I learned to iron clothes at her ironing board (that dropped down out of the wall in the kitchen).  You picked up the iron with a wooden handle. You squeezed this one place and it allowed you to grab the hot iron and get to work.  They had photos of some of them and I didn’t think to take a photo of them too.


A collection of needle cases.


Rugs crocheted with old feed sack fabric; and we think we invented recycling/upcyling.  Not!


Wondering what to wear for Easter?  Maybe this pattern would be helpful.  😉


A few final quilt shots…..

circa 1900 Redwork quilt  (Notice the cows-farm motifs).


John Deere farm tractor applique – steel wheels


Quilt block…name unknown to me.  Check out the fabric choices.  No trip to the fabric store to get coordinating fabrics!


Another block I don’t recognize.


I sure hope you enjoyed this visit to the Baldwin County Historical Museum.  It’s open Wednesdays through Saturdays, 9-3 , Rt. 98, Elberta, Alabama.  If you’re in the area, be sure to stop by for a step back in time.

For the husbands, there’s old tractors, old machines, old tools, a whole room devoted to the shipwreck “Republic” and it’s treasures found when the ship was dredged up.  There’s also this lovely swinging seat on the front porch where you can benefit from a cool breeze and admire the garden.

I’ll be back….and I promise to share the photos of the Pensacola Quilt Show.  I will, I promise.  I also want to share with you my latest project so stay tuned and come back soon!

Always in stitching,

Marsha


Around the Table Thursday take a Rest

Today I’m going to show you what’s happening around the table…but it will be what happened a week when I was so busy writing tutorials for your enjoyment.   After today, Around the Table Thursday will take a leave for a number of months.  That’s because the quilt guild is “on vacation” for the summer months.   Many of our quilters have departed for their home states, and more leave each week.

We are here for another three weeks and will continue to meet with quilting friends who also remain that long.  We will be working informally on our own projects but I’ll share when there’s something to share.

Right now, I’d like to continue catching you up on things I was unable to report on last week.  Last Thursday, the participating members of the Mini-Wallhanging Swap brought their treasures to give up to another member.  Of course pictures were taken and I can share what was given out.


I know there are more photos but I can’t seem to locate them in the files.  So many photos, so little time last week to organize them!

Anyway, you get the idea.  There were lovely, varied blocks enjoyed by all who participated.

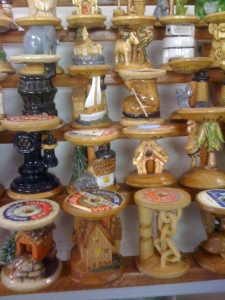
While we were having our meeting last week, a gentleman came in with his collection of carved wooden spools.  They were amazing.  I took some photos but they don’t really do his work justice.  However, I think you’d be interested in seeing the intricate work he does on small wooden thread spools.


I’m sure he had well over 200 spools, with that many designs.  He brought them to the right place.  Everyone around the table was intrigued with his handiwork.

Here’s something else we did last week.  We had a fat quarter sale.  Everyone drew a number and went around the table picking out one fat quarter at a time until all were gone.  They were sold for $1 each which was a bargain.  They were all Moda jewel colored marble fabrics.

In the center of the table which you can’t see very well is a fat quarter of various colors.  Each person was given one fat quarter of that material.  We have until January to make something using that fabric and whatever other fabrics we wish to use as long as the Challenge fabric, as we call it, is prominent in the creation.  The fat quarter looks like various bright colors blades of grass.  It’s quite unique and all the Moda jewels were great colors to go with the fat quarters.  It will be fun to see what everyone does with the Challenge fabric when we reconvene our guild meetings in January.

Here’s another thing that happened around the table.  One of our quilters, Marcia, won a small art quilt at the Pensacola Art Show.  I still have those photos to share with you and you will see them in the coming week, for certain.  In the meantime, here’s the quilt Marcia won.

It’s a two-tone blue log cabin block with sparkly thread and buttons making a random design in the center of the block.  I don’t know the woman’s name that made it but Marcia was so surprised that she won.  It’s always fun to be a winner!

That’s all for tonight.  Tomorrow I’m going with a few stitching friends to take another non-sewing friend to fabric stores.  Her days as a non-sewer are about to come to an end.  She wants a Quilter’s Hoodie Jacket very much and she owns a sewing machine she has never used.  She has asked me to help her learn to use it and help her make one of the jackets. Tomorrow we will buy fabric for the jacket and with that incentive, I will give her the first of many lessons on sewing.  I’m going to be calling on several others for consultation and input as well.  We want to make sure she gets a good start in sewing and we also want her to be able to wear this jacket in the next month before we leave so it will be a busy time in the weeks ahead as we get her up to speed.   She will be so happy when she feels comfortable with her machine and perhaps next Fall she’ll be ready to join the rest of us as we get together to stitch and chat.

Have a wonderful rest of the week everyone.

Always stitching,

Marsha

WIP Wednesday


Wednesday is traditionally, among the quilting blogs anyway, a day to share what you’re working on.  I currently have two actual projects going – one quilting, one “trope”.

Five quilting buddies and I have embarked on a six-month journey.  We’re participating in a Row Robin which I have put together after reading about many other Row Robins and Round Robins.  Here’s a photo, then more details.

Mariners' Compass blocks


These are my WIPs in quilting this week.  Each person participating in the Row Robin…

Left to right:  Candy, Ann, Marsha, Barb E, Brigitte, Barb L.

No, we arent’ playing poker at the poker table.  It just happened to be a quiet spot we could get together to set the rules and make some decisions.


will be creating a 36″ row of their of a block design of their choice.  We voted to keep our blocks within the 6″ to 9″ range.  We have set a date in May that each person will mail their Row to the next person on the rotation. With our block we are each mailing the Row, any scraps we wish to pass on to help the others make the next row, and a  journal.   The journal will have an entry by each participant, beginning with the Owner of the completed Row Robin.

For example, Barb L has completed her row.  I am next on her list to mail to so she gave me before she left, her Row, her journal telling how she decided on her block and what her color scheme or theme is, and 1/4 yard of her focus fabric plus some scraps she didn’t use in the Row.  It is now my turn to use her focus fabric and any fabrics I have to create a Row for her.  Here’s the fun part.  She won’t see the Row I’m making for her until everyone in the group has made her a row.   In November, she will receive her original row back along with five others surprise rows that each of us has made with her row in mind.

I’m currently working on my Row to send on (or hopefully, hand on) to Barb E. who is next in line after me.   Barb E. will look at my row, read my journal, and using the 1/4 yard of focus fabric I’ve given her and maybe some of my scrap pieces will make a Row for my quilt.  It will be one of five rows that will be made over the next six months that will return to me along with my original Row in November.

Every six weeks we will each send along a completed row to the next person in the rotation until all six of us have added a row to the original block supplied by the Owner.  Only then will the Owners get to see what the rest of the gals have created to go along with the original rows.

Need I tell you there’s plenty of excitement about this?    We haven’t even left the group for the summer, most of us, and there’s already talk about “can’t wait to get back and see what we’ve all ended up with”.

I decided to do a Mariner’s Compass.  As I told the gals when we met last week, everywhere I’ve turned since January, I’ve seen Mariner’s Compass blocks.  It started in January with my Quilter’s Hoodie.


Remember this?  It’s part of a Mariner’s Compass block I used for the pockets on my jacket.    From that point on, it seems I noticed Mariner’s Compass blocks everywhere!

We went on a Shop Hop in January and a featured quilt in one shop was a Mariner’s Compass.  We saw numerous Mariner’s Compass quilts at the quilt show in Pensacola.


When I skimmed through older magazines donated to the group, I saw at least one Mariner’s Compass in every mag.

Once I decided I wanted to do a Row Robin, it was a no-brainer that I wanted to do a Mariner’s Compass block for my row.  Then began a search for a block pattern for one that would finish at a maximum of 9″.  I didn’t find one after lots of looking.  I thought I might resize a pattern.   There are so many very small pieces in a Mariner’s Compass which is why there aren’t many small ones I think.  After shrinking one block pattern, I looked at those teeny, tiny triangles and determined that even with paper piecing I wasn’t going to enjoy doing something so small.

So, I decided to do just 1/4 compasses. The completed Mariner’s Compass block is made up of four smaller identical blocks to make one large block.


This 8″ block is 1/4 of a complete Mariner’s Compass.  This is what my row will be made of.  I chose to stick with blues and whites, ranging from very dark blue to very light blue.

That’s my WIP for quilting.

Once November comes and we’ve each made six rows, the Owner will have the joy of deciding what to do with the six rows.  The Owner determines whether to add more rows, sashing rows, borders, etc.  We are all looking forward to seeing what we get in the end.

A note about the six week intervals.  This is a group of RVers remember.  That means, inherently, that wheels will turn and  locations will change over the course of the six months.  If we were all together in one place like most guilds are, we could do a month between passing the rows along.  We need to give time for mailing and still have time for mail forwarding in some cases and still leave the quilter with enough time to put a row together while continuing their normal routines.  In my case, it is volunteering in a state park in Vermont all summer while spending precious time with my two children and their families which means some trips to Maine as well.  In other instances, it’s traveling to the West and back; visiting at home in Canada and traveling to the US to pick up the package when it arrives at a daughter’s house; gardening and house upkeep in Wisconsin, family time in Kentucky (unless it floods again and she’ll be traveling too).  You get the idea. Life goes on; we quilt around it.

Here’s the Row that was handed to me to add another row to by May 30th.


Orange and black are Barb’s focus colors with some lovely turquoise added in.  I’ll be coming up with a block to use for my row and will use some of her 1/4 yard of focus fabric (orange/black batik) and some additional fabrics I choose.  She won’t see my row or any others until she gets hers back in November.


Here’s Barb E. row.  As you can see, she has chosen orange as her focus fabric.   I was beginning to wonder why three out of the six of us chose orange when I heard they had been to A&E to look at fabrics for the raffle quilt only to discover there was an extra percentage off any “Orange” fabric.  Thus, orange is going to be in our lives this summer in triplicate.  Luckily, they will each be giving 1/4 yard of their orange fabric to each of us to use.

That’s it for WIP Wednesday for quilting.

I am working on a rug made with “trope”.  Trope is t-shirt roping which you make by stripping a discarded t-shirt into 1 inch strips and then you can crochet or knit with it just like any other yarn.  I saw the knitted trope rug in MaryJane’sFarm magazine in February and decided I would give it a go.  I’m using discarded red, blue and tea-dyed tan for my rug.  I’m about 2/3 finished with the rug which will grace my entryway.


I cut off the bottom rib on the t-shirt, then cut straight across from one underarm to the other.  Then I cut slits about 1″ apart on each side of the shirt.


My very first cut across the width of the shirt is from the first slit on one edge to the SECOND slit on the other edge.  It’s a diagonal line and allows me to continue with one long rope of t-shirt fabric.  From here you just cut slit to slit across, the next slit to the next slit.  I do the top layer of the shirt, than move strips to cut the bottom.  This way I”m sure not to cut it off.  If I do cut it off, I can join the two strips into one big one so nothing is lost.


Stretch the strip and it rolls up naturally.  Then roll the entire length into a ball and knit/crochet as you would normally.


My WIP trope rug:


It’s thick, soft and will be very durable.   If you wonder what I do with the remaining top of the t-shirt.  They make great rags!  DH loves to receive these.  However, if you need more of one color and you have only that t-shirt top left, you can use it by cutting like you are making a maze.  Miss Linda showed me that yesterday.  Thanks, Linda.

That’s it for today.  I need to get going to line dancing and later to water aerobics so I’ll be busy, busy today as usual.

Hugs to all.

Marsha


Australiana

I just have to show you what I got from my friend Anita’s travels to Australia.  I had asked her to look for some Aussie fabrics or pincushions or such and gave her some money to spend.   I knew she would find some things I’d enjoy.  She did, I do, and she’s back home.  I couldn’t be happier!

First, she brought me back this lovely tea towel.


The deep maroons (not show quite the right color in this photo) and the greens look nice in my RV.  I’m not using it for a tea towel!  I am going to put a sleeve on the back and give it a place of honor on my quilt wall.

At a quilt show Anita went to in Sydney, she found a wonderful pack of Australiana novelty fabrics within my price range so these are what she got for me.  They are lovely Australiana fabrics by Nutex.


Wonder what this plant is?  The selvage says “Golden Wat”  which could mean golden wattle?????  Anyone know?  Margaret??? Help if you can!


I’d love to see these birds in their natural setting.


These I’m happy to see on fabric!  Crocs!


Wildlife of Australia, awesome.


What would you make with these lovely novelties?

Anita met a fabric designer, Julie Wallace, at the quilt show and was able to get some of fabric she had designed.


These are colors I love.


Lucky me to have my neighbor back, my quilting buddy and landlord AND have such lovely items to use in some projects.  I’m going to have to search for just the right projects to use the novelty prints and the Julie Wallace piece will work well with many of my other fabrics in that same color.

It’s a beautiful day here in Alabama and I just ran across a quote that fits my lifestyle:

“We wander for distraction, but we travel for fulfillment.”  Hilaire Belloc

Marsha


Time to Catch Up

Hello readers.  I put all the packages in the mail to my five winners.  Be watching, ladies, for your table toppers and congratulations again.

I told you I have so many things to share with you that I’ve seen in the past few weeks.  Let me highlight a few of the wonders of my world. Just in case you think we quilters are just here having fun and doing our “own thing”, I want to share several of the charity projects we have accomplished this year.  Giving to our own community and the community at large are a large part of what our quilt guild does.

Rag Quilts (flannel and homespun)

Rag Rugs Waving


One day last week, we had a very windy day.  It also happened to be the day we had to get the rag quilts out on the line for an airing before their delivery to the Sheriff’s Home for Boys.   This photo begged to be taken.  It was so picturesque!  Friday, three of the quilters drove through torrential rain to the Home for Boys to deliver the 12 quilts made for them.

The recipients were not at home as it was a school day.  The Director of the Sheriff’s Home for Boys gave them a short indoor tour with a promise of a longer, outdoor tour at a later time.  You may not be familiar with the Sheriff’s Home for Boys.  They are found throughout Florida and Alabama.  They are a safe haven for boys who can’t remain in their homes for a variety of reasons, none of which are the fault of the boys.  These are not boys who are troublesome; they are boys who are not safe in their own home for whatever reason.

They live in small homes on the ranch owned by the Sheriff’s Home for Boys with house parents to care for their needs.  They have typical chores for families living on a farm/ranch and learn many skills that will help them when they get out on their own.  They participate in community events, attend local schools and churches and learn what it means to live in a happy, healthy environment.

Each quilt we made for the boys, and the extras we sent for newcomers, was given a label with a boy’s name on it.  It is theirs to keep; nothing will cause them to have to give it up.  We hope the boys graduating and going on to college will enjoy taking their quilts with them.  I believe there are two boys graduating this year.  They will be replaced by other boys needing this safe, friendly environment to grow in.   There will be quilts for each of them too.  The label has a place to insert the new boy’s name.  Owning something that was made specifically for them can be a very meaningful thing for a boy who arrived with little or nothing that belonged to him.  Our hearts are filled with love for these boys and hopes for their futures as useful, hard-working adults.  The Director of the Sheriff’s Home says their motto is, “It’s easier to grow healthy boys than it is to mend an adult.”   How true!

Raffle Quilt 2013

In addition to the rag quilts, our group has been working this winter on blocks for the raffle quilt we will raffle off next winter.  The quilt we raffled off in February brought in $643 in ticket sales.  These tickets are sold strictly within the RV park, not outside to the general public.   We then turn over most of the proceeds to our Club Manager to use for needs of the Clubhouse not supplied by the budget and it   benefits all groups who use it. The quilt guild is treated very well by the Club, given plenty of room to quilt and several places to store our supplies.  I’m sure we have more space in the Clubhouse than any other group.  We keep just enough money to pay for the supplies needed to have the next raffle quilt completed by a local long arm quilter.  Here is a picture of the group who worked on the quilt, and the quilt we will raffle on in 2013.

Raffle Quilt for 2013


The ladies seated, holding the quilt, are the ladies who took the lead on this project.  Marcia, Barb E, Ann, Barb L. and Carol all worked very hard and completed the quilt top (squaring up everyone’s blocks and piecing the top together) in record time.   They also had some fun-filled trips to fabric stores in search of the perfect border fabric.  These gals will go to a quilt shop at the drop of a hat!  Won’t we all?

Barb K (the lady in the blue blouse way in the back in the photo above) gave her yearly sweatshirt jacket class.  These are the two designs Barb teaches, patches (pink) or strips (blue).  She had 10 stitchers attend this class.

Barb's pink sweatshirt jacket

My sweatshirt jacket from last year's class


We had a Crafters’ Wine and Cheese Party one afternoon which was an opportunity for crafters in the Clubhouse to show off things they had completed over the winter here.  Just a few photos from that:


Dale and Barb weren’t here all winter but they did some chair caning and made teddy bears.  There were many, many chair caned in the clubhouse most of which were auctioned off to benefit an assisted living facility owned by our RV Club and situation in Livingston, Texas.  RVers can live their when they need assistance with daily living or are recuperating from operations, etc.  It’s a wonderful benefit any of us in the Club are eligible to use.  DH and I volunteered a month there one year and were so impressed with the great care that is given anyone who comes to the CARE Center.   The Center has been written about in AARP and several national magazines as it provides the service at a much lower rate than most assisted living facilities can, due to the volunteers from within our Club.


Dan and Barb are both quilters and teddy bear makers.  Can you tell they are from Tennesee with all those orange bears?


This is Diane, bettern know as “Teddy Bear Lady”.  She teaches the classes on teddy bear making, with well over 30 being made in one season. Each is named and gets a birth certificate from the TBL.  Diane also makes jewelry and canes chairs.


Neal does wood working and sells his products several places including the Club’s monthly Flea Market and Craft Sale.


We had seven Quilter’s Hoodies in the room at one time so we took this opportunity to have photos taken.  Betty, on the left, was the instructor.  Then there’s Barb L., Barb E., Candy, Carol and me.  Here’s the jackets from another angle.


Isn’t interesting to see how different each jacket turned out?

There were many crafters showing their finished projects and it was a fun time to chat with others.  The wine and cheese was good too!


I showed off my Civil War quilt blocks I had been working on since the first week of January, 2011.  If you’re new to my blog, you can locate more information about these by using the buttons on the right to Civil War Quilt Blocks.

I’ll share a few more photos today, and save others for another day.  Last week we had a class, held by Linda, on teneriffe.  You can attend a class on a new craft or a familiar one just about every day, any day, any time.  Teneriffe is a type of stitching with craft thread, needle and sometimes beads.  Here are some of Linda’s samples. I’ve been looking forward to this class since I saw some of this needlework on Linda’s shorts last winter!


These could be used as patches on jackets, purses, pants, and decoration on quilt blocks, shirts, and just about anything you can think of.


Linda is showing teneriffe as a decoration on a jeans purse.  Nice!!


So pretty!

I have just a few more photos to show you. One day last week, when I had too many things to do in one day, some of the gals learned how to make a small bag from a man’s necktie.


Aren’t they neat?   Unfortunately, I managed to delete a whole day’s worth of photos so I can’t show any more necktie purses OR the mini wallhanging swap.  Sorry, gals.  Pushing keys too fast and hit the wrong one too soon.

That’s all I’m sharing today.  When you come by on Wednesday, I will show you my WIP (Works in Progress).  I have one started (today) and tomorrow I’m going to work on another project for a while so I will have some things to show you on WIP Wednesday.  I hope to share Eye Candy this week as well.  Pensacola Quilts! gave me lots of opportunity to collect photos of gorgeous quilts!

Be sure you come back soon to see what else I have to share.

Keep Stitching!

Marsha


Winners, We’ve Got Winners!

Wow!  What a great week with the Blog Hop Party going on.  I have to say I didn’t get to visit all the blogs as it was a very busy week here at the Plantation, and in my own little world.  I did visit about half of them and I was impressed by the great give-aways available.  I wish you all luck!!

I had to wait for my “Random Number Generator”, Mr. Big Hands, to wake up before I could determine the winners of the table toppers I was offering.  I have sent emails to each of the winners so it’s only a matter of time before I share with you which toppers they are getting.  I am sending “Bunny Hop” off to my grandson for his Easter table but the others were up for grabs.  Well, not really “grabs” as you had to be lucky enough to have your  number chosen to win one.

Without further ado, the winners, in the order picked,  are:

1.  Sandra V. from Sandrascraftcorner.blogspot.com will be receiving the “Orphans”, chosen by her husband.

2.  Jodi G (usairdoll) will be receiving “Blooming Pinks”.

3.  Cindy at quiltdoodledesigns.blogspot.com will be receiving “Flowers Running Wild”.

4.  Pippa at pippaspatch.blogspot.com will be receiving “Woven”.

Pippa is from France so I got an international winner this time!  I’m so happy as I won two international giveaways during the last Blog Hop Party in December and I really hoped I would have on this time.

So, I’m just waiting to hear from the four of you.  If I don’t hear from you by Wednesday, March 28, I’m going to draw other winners so hurry and email me back!  I want to make sure four of these table toppers are heading out the door soon.

With that duty done, I thought I’d share a few treasures I got yesterday.

Here’s a new addition to my pincushion collection.  Yesterday I had lunch with a few gals from the park and then we went to two antique/collectibles shops.  The first one was “Just Stuff” which is run by Sheryl, a sweet southern lady who has become a friend since I first found her shop.  I was so happy to bring about 12 of my friends to see her shop, and I think she was happy too!

I found this sweet little pitcher from a child’s tea set sitting all along in the curio cabinet.  I thought I could make it a lovely little pincushion, and the price was so perfect.   It’s 3″ square and just lovely to look at.  I think it calls for a pink cushion.

This will become a pincushion.

After Sheryl’s “Just Stuff”, we went on to the Antique Mall which was on our way home.  They had lots of tiny shoes that tempted me sorely.  I actually had a very unique boot, about 4-5″ tall in my hand when I happened upon a vintage pincushion.  It was $12.00.  Do you think it was a good buy?

I do!  It’s not sterling silver, but pot metal which is what many pincushions were made of in the Victorian era I learned.  I went online to learn a bit more about this pincushion if I could and I found the exact same pincushion listed under Vintage pincushions on eBay.  At the time I found it yesterday, the bid was up to $39.  I thought I had done VERY WELL.   I put it on my Watch List just to see how high it goes.

My friend, and fellow quilter, Anita got back Thursday from Australia. She picked up some fabric for me at a quilt show there with the money I had given her and the fabrics are SO neat.  I will photograph them and show them in another post, along with the lovely tea towel she brought.  She also brought me a piece of fabric designed by a woman she met there.  I think I can share that as well, but need to check with Anita on that.  I know the woman was very strict about what ‘Nita could photograph in her booth.

So many things went on last week while I was busy showing all the tutorials on table toppers.  I’m way behind in sharing photos and telling you what’s happened Around the Table and all.  It’s going to be  a busy week or so ahead as I cover all those things for you.

I’m off to make a commissioned purse.  Years ago, I sold a large number of quilted bags in a store on the grounds of the campground we worked at.  My friend, Ginny, who was working with me asked me to make one for her daughter which I did.  It was made with Strawberry Shortcake fabric.  Well, the daughter has been using that same purse all these years (at least 8-9) and now Ginny wants me to make one to replace the old, ratty one.  That’s on my “short list” for today.

Once the SS bag is done, I’m going to start on my blocks for the Row Robin.   I have already received my next row.  Several of the gals are ready to leave the park and since they had their first rows done, they passed them on.  I have Barb’s and it’s all oranges and blacks.  I need to complete my first row to pass on before I start on the row for Barb but I have a pretty good idea what I’m going to do for her.  I’ll be able to show you my first row, but I won’t be able to share the next five rows I do as they will remain secret from the owners until the end of the Row Robin in November.   That’s a long time to hold on to five secrets, isn’t it?   Yikes!!!!

So, I’m off to sew and wait to hear from my winners.  When I determine what each one wants as their winning table topper, I’ll post the photos one last time.  Remember, the tutorials will be there if you decide you want to make any for yourself.  I’ll be listing the tuts as one tutorial under the “Tutorials” button so you can locate them and scroll through the week’s worth instead of leasting each one separately.

I sew, I sew,

It’s off to work I go.

Have a happy day!  Marsha

Blog Hop Party Day #7 and a Tutorial

Does it seem possible that it’s day 7  of the Blog Hop Party already?    It’s been so much fun….. and so much work for me.  I’m not complaining.  I love to share my ideas with everyone and anyone.  It does, however, take at least an hour to write up one of these tutorials and that doesn’t take into account the time it takes to make up the actual table topper which is pure fun for a quilter like me, and photograph the steps.

I’m happy to have you all here, and so thrilled to have so many visitors stopping in.  I hope many of you will become followers and get every post alert so you won’t miss anything that’s going on.

Michele from Quilting Gallery has given us all a whole lot of fun this week.  Thanks, Michele.  I know it was hard work for you, too, and I share with everyone else as they say thanks!!

Today is the final day of tutorials. I actually drafted this post several days ago and I see I’m having a bit of trouble with the photos staying where I put them in the post.  I hope it doesn’t confuse too much.  I still need to make one for myself but I’ll share that with you when I get it done.  Today I’m sharing my Orphans. It’s a reversible table topper. Actually, they aren’t MY orphans.  Like orphaned children left on doorsteps or in churches, these two orphans (definitely related by birth) were kept together and left in a box of other cotton fabrics and I found them.  The difference between the orphans and the other cotton fabrics?  They were completed blocks!!   These were not Log Cabin or Churn Dash, nor Drunkard’s Path or Trip Around the World.   No, these were much more difficult blocks.  Just look and see!

A careful look at the two orphans told me they were definitely related.  Now how was I going to take one and not take the other?   One never wants to separate siblings if there’s any other way to  handle it.  I put my brain to work and came up with a way I could use both orphans and keep them together forever.  Thus was born

“The Orphans” Table Topper

If any of you have done a “Stack and Whack” quilt, you know it takes some precision to get all the stacked fabrics so that each has exactly the same designs cut exactly alike.  Look at those two orphan beauties.   I hope you don’t have any beauties like this stashed away somewhere but if you do, here’s the solution.

Make a reversible table topper.  How, you ask?  That’s just what I was going to tell you about.

One block was slightly larger than the other.  I’m not sure how that happened but to compensate I cut strips slightly different in width for each block and stitched them on.  I measured carefully so that each finished block would then be the same size.  Yes, one block on the left has skinnier strips than the block on the right.  I guarantee you aren’t going to notice.

That was the fastest two blocks I’ve ever made!  It sure is nice to discover someone else’s orphans.  Definitely less painful than giving birth to those two beauties.  Yes, I have made a Stack N Whack quilt.  No, I probably won’t ever make another one but you never know.  I gave mine to a young woman who had total disregard for what it takes to make a quilt.  I wish I had known that before I gifted it; she would have gotten something else. She threw it behind a chair and left it there.  When I would visit, there it would be curled up on the floor behind the recliner, forgotten.  Lesson learned – only make quilts for people who will appreciate them.

Back to the table topper.  You could, of course, do this same thing for a pillow if you have orphans of your own.  You could even purposely make two blocks using the same fabrics placed differently to make a table topper like this.

Keep the two blocks facing each other (like kissing cousins) and put the batting in back of one and pin them together – ouch! – making sure that the blocks lined up.  I did this by sticking a pin through the layer from corner to corner, all four corners, to match up the edges.


However siblings, when facing each other often need a little space so I quickly stitched around the four sides, leaving a 5″ opening on one side to turn the blocks.  Trim the batting away from the sides.


Now turn the project piece right sides out.  See, it is like making a pillow.  Make sure to poke the corners out to get nice crisp points.


At this point if you decided you wanted a pillow you could put stuffing or a pillow form in and stitch it closed. I’m going to continue with my table topper and I have a dilemma.  What will I do for a quilt design?  I have two different blocks here, related yes, but still different blocks.  If I decide to quilt around the flowers on this side, the stitches aren’t going to be around the same flowers on the other side.

I decided to free-motion quilt a loose petal-like design starting at the center and moving out.  It starts like you would start a spiral and grows larger as you move out.  As you get further out, you start to make the curves of a flower.


You can tell a little, especially as you get to the maroon edges.  I was using pink thread this time. I simply stitched along the outside edge of the table topper on all four sides as my free-motion quilting went into the border a bit.

I thought you might like to see the “Momma” fabric.  “Momma” is southern talk, y’all.  My children call me “Mom” or “Mum”.   My sister, Sybil, twelve years younger than I am calls me “MommaSister”.  She’s been in Kentucky a LONG time and has forgotten her Maine roots. Here’s Momma.


Isn’t it just amazing what designs can be found in fabric?   The key to any Stack ‘n Whack is to choose fabric with good-sized design features.  Large flowers, large animals (I used wild animals and had a different animal featured in the center of each block), and it could be just about any design.  There should be lots of space between the flowers or animals.

In case your wondering about my “orphan” story since I have “Momma” to show you, the story is that the orphans were donated by the same person who donated the momma fabric.  However, they were separated at birth I guess.  The orphans were in a tub with small partially completed projects.  Momma was in a tub of larger fabrics.  It was purely serendipitous that they ended up with me.

I have had the orphans for several months and the other day I went over to the Clubhouse to see if I could find something that might go with them and, Serendipity, there was Momma!   I didn’t realize it when I first picked it up but after looking at a few other pieces, I realized I was holding the fabric Momma that created my two orphans.   When I took Momma home, I was thinking I would choose one of the blocks to make the topper and use the Momma for the backing.  However, my brain works overtime as any of my quilting friends can attest and I decided I’d keep the orphans together and Momma didn’t deserve to have them back after leaving them for so long.

Thus ends my orphan story, and my table topper.  It’s going to be hard to let this Orphan topper go as I really do love it.  However, we’ll have to see what is chosen by the winners.

It’s Friday and time to find out which four table toppers are going to be among the Give-aways.  Here they are.

# 1 Blooming Pinks

Close up of quilted detail


#2 “Flowers Running Wild”

Close-up of quilted detail


#3 “Woven”

Close-up of detail

#4 ” Orphans”

Side One – Above

Side two – Below


Leave me a comment telling me which table topper you would prefer, and also a second choice, if you are a lucky winner.  Winners will be announced here on Saturday and emailed as well so make sure I can see an email address somewhere in your comment.  Good luck everyone!  I wish I had one for all of you but I’m only one woman.   Thanks for coming by this week and I hope you are all lucky and win something from one of the blogs you visited.  By the way, the Bluebird table topper is available if you prefer it to any of the others and I’m sending the Easter Bunnies to my grandson for their Easter table.  Remember, I’m giving away FOUR table toppers, so that’s four more winners beside Joyce Mitchell who won the first day and is receiving the Basic Table Topper Kit.

Good luck one and all, and I hope you’ll come back to visit after these crazy Blog Hop Party days are over.  I’d love to have you following along.

Always in stitches,

Marsha

Blog Hop Party Day #6 and Another Tutorial

Thanks to all for the kind words about my tutorials.  I’m having a wonderful time reading all your comments.  Please, keep them coming.  We’re in the home stretch on our Blog Hop.  How many blogs have you visited?  Leave me a comment telling me how many you think you’ve gone to during this blog hop, and also tell me what you think about today’s table topper.   We’re blog-hopping and hoping to win some great giveaways.  I’ve seen books, patterns, handmade items, fat quarters, charm packs, notions — there’s no end to the things being given away on these blogs!

If you want to take part, hop in quick and click here to see the entire list of blogs participating.  We owe a huge thank you to Michele at Quilting Gallery for organizing this whole party.  When you go to check out the blog list, don’t forget to visit around Michele’s blog.  I saw two great gifts she’s giving away too.   Now on to today’s fun.

Woven Quilt Table Topper

I’m getting away from flowers and bunnies today, friends.  This is a table topper even a bachelor would love to own.  I’m using two fabrics only throughout the entire topper.

I started this project looking for two fabrics that I could use together, both had to have something that would look good in small pieces.  I chose two very different fabrics and I’m happy with the results so I suggest you choose two fabrics with bold designs.Big prints make a great design effect.  Here is what my two fabrics look like.

I would not normally pair these two fabrics up but when seen in small pieces, they actually look quite good together I think.

First step is tearing – not cutting – one inch strips.  Decide how big you want your table topper and tear that many strips of each fabric.  I decided to go with 12″ again as I have a smaller table.  Table toppers can be as large as you wish by adding borders to any of the previous designs I’ve shown this week.  I tore 12 strips of each fabric.  The torn edge of the strip gives an interesting look to the finished product.  There really isn’t any reason why you can’t cut, but I’m going for interest in my table topper. Press the strips as the torn edges want to turn under and you want them visible.

If you have done weaving of paper (back in your school days), or more formally on a loom, you have the idea of what’s coming.  I recall weaving red and green paper strips for a holiday project one year when I was going to school and I know I had my third-graders do paper weaving.  I’m pretty sure I never tried the paper weaving with my Kindergarten classes.  Also, paper doesn’t lend itself to flipping the edges over.

Start by cutting a foundation, a piece of fabric about 2 inches larger than your finished block size.  Lay this down on a surface.  You can see here it’s on my cutting board which has the added bonus of helping to make sure you are staying as straight as possible.   Lay down one set of strips close together.  Tape down one end.  I use painter’s tape as it removes from the surface without leaving any residue.

Now lift every other strip up and back.  You are now seeing the large block I used for the back, or stabilizing, part and the strips alternating up and down.  I see now  I should not have used the same fabric as my strips.  I hope you don’t get confused about what you are seeing in this next photo. The blue strips are the only ones that have been used so far.  The other visible fabric is a piece of the same large print I used for strips.  I definitely should have chosen a different fabric to make this more visible.  Sorry.  Keep watching I think you will see what it happening.

In this project you want to have fabric glue available as it’s much easier than pinning every row.  Put a dab of fabric glue on each strip across the row.  Dab, don’t draw, the glue across as you want to keep everything in place.

Lay the first of your other strips horizontally across the vertical strips.  Put a dab of glue where the vertical strips are going to be pulled back over the horizontal strip.  Pull the vertical strip back over it as you go.  It looks like this.

You are going to repeat this process over and over until you reach the end of the vertical strips.  Don’t forget to keep putting those dabs of glue on as you lay a new strip.  It will help when you are ready to transport the entire piece to the sewing machine and manipulate it under the machine.

Keep the strips close together as you put them down.  You want as little open space between each small block as possible, preferably none.

It’s shaping up and starting to look like a checkerboard.  Don’t worry about the tails (shown on the right. )  You’ll be trimming and using them as you get further down.  The strips are much longer than you need for your blocks most likely, mine were.  I cut them off when I ran out of torn strips and continued down the remaining area.

Be sure you are using that glue stick.

Ta-dah!  The weaving is finished. Now it’s time to pin.  Put at pin on EVERY square around the outside of the project.  Do not pin the overhanging, extra length of the strips. Those will be trimmed off.  You are going to be moving your project and want everything to stay in place.  It’s time to make a sandwich – a fabric sandwich.   Cut batting a few inches larger than your project piece and a backing fabric slightly larger also.

Layer these together and once the sandwich is together,  move your pins to go through all three layers of the project.

Now it’s stitching time.

Top-stitching and quilting as you stitch can be a continuous line of stitching on this project.  I started stitching in the top of the center strip.  I stitched all the way down the vertical 1/4″ from the raw edge.  When I got to the end I went beyond my checkerboard and turned around to go back the other direction on the next strip.  Turn again and start down the vertical.  You are on the same strip you started on but now stitching down 1/4″ from the other raw edge of that strip.  Keep stitching back and forth down the strips.  Each strip will have two rows of stitching.  I used a variegated thread to do my top-stitching.  No matter what color I chose, there would be visible thread so I chose the variegated.

Once you have reached one end of the project, go back to the center and work out to the other edge.

I hope you are removing pins as you go, not stitching over them.  You can do damage to the bobbin case under the throat plate of your machine.  Eventually, after you’ve probably replaced many needles from breaking them, you will also be replacing your bobbin case.  Forewarned is forearmed, so remove those pins as you get to them.

When you get to the last vertical row of stitching, turn and start down the over way.  Stitch all the way, 1/4″ away from the raw edge, of each side of the remaining strips.

You have nice little blocks within each of your blocks on the large square.  Now trim off the unwanted edges and square it up.  With the size I used, it’s especially easy because I lay my 12 1/2″ square ruler on top, make sure I have it lined up straight and trim away.

Time for a binding.  Remember that large print with the flowers on it?  You wouldn’t know that’s what I used, would you?   I’m also going to use it for the binding as it’s going to be just a narrow strip that shows.  Oh yes, I used it for the backing too! Just two fabrics used throughout the entire project.

I used a 2 1/2″ binding, folded, to make my binding.  Here’s the finished table topper.

Machine stitch your binding or hand sew; that final step is purely a personal decision.  I very rarely do a machine stitching on the back.  I never am able to get it lined up so the stitching is in the correct place on the front.  If anyone knows the answer, I’ll listen but I have tried it a number of ways and it always seems to go somewhere I don’t want it.  Hand-stitching the final edge is my answer.

I hope you like this table topper.  It is a fun project to make.  I think if you decide to use narrower strips, anything less than 1″, you could possible stitch in the middle of each strip rather than 1/4″ from each edge.   Let me know if you try this.

Happy Stitching.  Come back tomorrow to meet the Orphans.

Marsha

Blog Hop Party Day #5 and Another Tutorial

Thanks for dropping by!  I hope you are enjoying the Blog Hop Party that Michele from Quilting Gallery put together.  I haven’t gone to all the blogs yet as I’ve been pretty busy going to events and doing a few quilting chores at the Clubhouse in preparation for this week’s meetings (uh, and making table toppers!) but I do plan to drop in on them all, even if I don’t get to leave comments everywhere.  I hope you will too.  I think the button on the side isn’t taking people to the Quilting Gallery.  You can get there by clicking here.

Have you made any of the tutorials yet?  Have you seen them all so far?  If not, go back to the older posts since Saturday.  Each day is a different type of technique or skill to try.   Today’s feature will be a bit different from the others.  It’s a project you could do with your children; in fact it’s geared to use with your children, grandchildren or just do it yourself.  If you’re an adult who still enjoys coloring, this one’s for you!

Bluebird, Bluebird, Through My Window

The design for Bluebird… is not my original design.  I got the drawing from a 2005 Quilter’s World magazine.  The bluebirds were designed by Diana Sikora.  I always like to credit the designers when I use their patterns or designs.  I think it’s the proper thing to do, don’t you?  Here’s Diana’s design as I interpreted it.

She had two birds holding a ribbon and I just took the two birds and traced then in several directions to create my circle.  I traced the birds onto a piece of Reynolds’ Parchment Paper, the same kind you put on your cookie sheet when you bake.

Then I took the parchment paper and laid a very light sky blue cotton over the parchment.  I took those two items and held them up to the picture window so the sun would shine through it and traced the design onto my blue cotton with a mechanical pencil.

Next, still using the mechanical pencil, I drew free-hand the ribbons between the birds and I colored them.

You can use either your children’s wax crayons or fabric crayons.  This was done with fabric crayons as they were the only thing I had.  Never one to be afraid to share my mistakes, I’ll tell you about this.   I was intending to use the wax crayons.  You color as you would on paper –  or have your children draw a picture on fabric and color with their wax crayons.  Once the coloring is done, you lay the fabric crayon side down on to a piece of white cloth and cover the cloth with paper towels and press the picture.  You have to do this a number of times to lift the wax off the cloth.  Once done, the color is set and you move on. You also need to have newsprint under your work and a piece of white paper between the iron and the cloth to protect your iron.

Well, I had no children’s wax crayons!   I had sent them home some time ago with the grandson, Jack.  All I have is a basic 8 box of fabric crayons that I picked off a bargain table for twenty-five cents.  I had never used them before.  Being me, I just used them without reading the directions!!!! Yes, I do that when I think I know what I’m doing.  You would assume by this age I would have learned to read directions first, especially since I spent 25+ years teaching school and telling children to read the directions carefully!!!

Teachers are the worst for filling out forms without reading the instructions, especially me!

The fabric crayon box (which I read AFTER I was done) said,  “Draw design on white paper; brush excess crayon specks from fabric.  Place fabric on ironing board constructed with several layers of newspaper topped with plain white paper.  Lay paper face down on to fabric.  Use a clean piece of paper between iron and paper design.  Iron with steady pressure over entire design until its image becomes slightly visible through back of paper.  Remove paper carefully.  The imagine is transferred in brilliant colors and will remain on the fabric.  Decorated articles may be machine washed using warm water and gentle action.  Do not place in dryer.”

I looked at my coloring.  The colors weren’t “brilliant”; in fact, I didn’t think they were particularly pretty at this point.  I also wondered what was going to happen since I had colored directly onto the fabric not on the paper.  “Forge ahead”, I said to myself.  ‘ All that can happen is I have to re-do the design later.’

So, forge ahead I did.  I put paper towels over the coloring, several layers to be safe and ironed over the whole thing.  I lifted the iron and the paper towels.  I had bluebirds and red ribbon, much prettier than at first.  I repeated this process, just as you would if using the children’s crayons until no more wax or color showed up on the paper towels.

The next step is to stitch a design, if desired, in the middle.  I used my  Glad Press ‘N Seal again, laid it over the quilting design in Diana’s Sikora’s article and traced it.  Then I lifted the Press ‘N Seal and moved it to the center of the birds.  I pressed it down with my hands securely, being careful to remove any wrinkles.

Now is the time to make your “sandwich” again with backing, batting and the design on top.  Quilt the center design using your free-motion foot.  Follow the lines drawn on the Press ‘n Seal but don’t stress if your lines are slightly different.  When you lift off the plastic wrap, no one will be able to tell if you followed every line or not.   You want to use a color that will show up as this is part of your overall design.

Here I will tell you that getting the Press ‘n Seal off the center of this design was difficult!   There is so much stitching together in the center that the plastic just wants to stay there.  I used a pin and also tweezers to pick the plastic off.  I also loosened a few stitches so be careful but don’t stress if you loosen a few.  We’re only human, you know.

Now quilt around the bluebirds.  Don’t forget to stitch around the ribbons too!

It’s time to decide how to finish your table topper.  All my other toppers have been square so I decided to continue the roundness of the circle of bluebirds and made mine round this time.   I took out the biggest plate I own and laid it on top of the design.  It wasn’t quite large enough!

Needing at least a 1/2 inch around the design to place my binding, I drew a line about 1/2″ away from the plate.  Free-hand is fine.  If you’re nervous about free-hand, get out a ruler and measure away from the plate edge 1/4″.  Use that mechanical pencil to draw dots and then connect the dots.

Prepare your binding.  The most important thing to know about doing anything curved in quilting is to cut your fabric on the bias.  The bias is the stretchy direction.  If you tug your fabric on the “straight of grain”, it stays straight.  If you tug it on the bias (which is usually diagonal), it will stretch.  In doing binding for a circular item, you want stretch.  You want the binding to lay down flat and the entire project to lay down flat.

Cut your 2 1/2″ binding on the bias.  Stitch it to the front of the design, right sides together.  You would join the edges just as I discussed on the square projects, turn the binding and pin in place.

That’s it.  Stitch your binding in place and it’s ready to use.  Thus ends another tutorial on table toppers.

Imagine how much it would mean to someone to receive a table topper that their special child had drawn and colored the design.  As a grandmother, I can attest that when my grandson makes something for me I consider it a very special item.  Keep this in mind if you’d like to create a special gift for a grandma, mother, aunt, etc.  Get your children involved in the process.  Encourage them to create art.  Teach them to sew.  I taught my grandson to sew this past summer and we had such fun together.  Memorable times.

I hope you have enjoyed this tutorial and perhaps even learned a tip or two.   What did you learn from this tutorial?  Leave me a comment telling me what you liked about it or learned from.  Have you sewn with a child?  Leave this comment for a chance to win one of the four table toppers I’m giving away on Friday.

Hugs and Hurry Back.

Marsha
Blog Hop Party and Give-Away Day #4 and a Tutorial

We meet again!  It’s nice to have you back with me again.  If you’re just joining us for the first time, welcome.  To all my many first-time visitors, thanks for coming and I hope you decide to follow the blog and keep up with all that goes on here.

During this exciting Blog Hop Party and Give-Away, you have access to hundreds of blogs at your fingertips. Click here or on the box over to the right to jump to the long list of participating blogs.  At each one, just for commenting as they request, you can be entered to win a prize.  No strings attached.  It’s the blog owner’s way of saying “Thank You” to all the readers who take time out of their busy days to stop in and read the blogs.

I appreciate my readers and hope all of you will “Follow” my blog.  You can enter your email address over on the right side where it asks if you want to receive emails notifying you when I have a new post.  I’m giving away FOUR prizes this week besides the one I gave away Sunday morning.   By leaving a comment you are entered to win.  If you return on Friday, or any of the other days this week, and enter a comment, you will be entered again.  That betters your chances of winning.  On Friday all four of the table topper prizes will be shown, in their completed state, so that you can comment to tell me which one you’d like to win! Remember, my give-aways are available to International and U.S. readers.

Today’s Table Topper:  “Flowers Running Wild”  with Thread Painting

Today’s tutorial is a quick and easy topper to make.  It’s simple lesson on thread painting.  If anyone has seen thread painting, it can get very detailed and very beautiful.  I”m just touching the tip of the iceberg here and don’t want to scare anyone away.  Quilting should be fun and this is just plain fun!   Sometimes we want serious, formal things; sometimes just fun, simple things.  Today it’s all about having fun.

Thread painting is using your machine, needle and thread to paint the details of your picture.  In this topper, we are adding the flower details, making them come alive, and add putting down some stems and petals so they don’t float away.

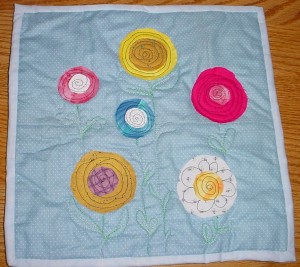
Start with your three layers:  top fabric, batting, backing fabric.  Cut out some 2-3″ circles of various colors.  Make as many as you like.  Each of these big circles with need a corresponding little circle which will serve as the center of the flower.  I used fabric glue once again, just a dab, to hold them in place.

I used black thread for stitching the centers of the flowers.  You want this stitching to really stand out!   I just stitched in a spiral starting at the center of the flower and moving out.  Stitch as the spirit moves you.  No two will be exactly alike and it doesn’t even matter if your hands wiggle and the lines aren’t perfect.  This is a free-form art.  I used a variegated green thread for the stems and leaves.

I thought this one looked like a daisy so I thread-painted the white petals in with my black thread again.  The variegated green makes nice leaves.  Remember, leaves don’t all look alike.  Throw away your free motion fears and have fun with this project!

Another topper ready to be bound and stitched.  Here’s something I thought of AFTER I had the stitching all done on this one.   You could make the stems come from different sides so it looks like the flowers are growing from all from edges instead of just the bottom edge as I did.  Stitch a couple of the stems to the left edge, a couple to the right edge, a few to the top edge, a few to the bottom edge.  That way  anyone seated in front of the topper will see flowers growing from their side.  Just an afterthought I decided to share. That’s what I’ll do next time I make one similar to this.

Here’s the finished topper.

Sometimes the backs are as cute as the fronts, even when you don’t plan it that way.

This is the back.  It’s pretty cute isn’t it?  It’s a piece of hand-dyed cotton that I got in a scrap bag at one of the quilt shows.  There were about 8 different colored hand-dyes in the packet for $4.00.  It was perfect for this backing and it got it out of my stash.  Purple you say, she’s using purple?  It’s getting it out of my stash and it’s Lavender not purple. How’s that?  I must say, even I would use this side now and then.

That’s it for today’s tutorial.  Do you have a favorite yet?  Which one?  Are you wondering if I”m going to do flowers every single time?  Answer:  NO!

Well, I have one more table topper to finish for you so I’m off.  It’s also quilt guild day and we’re having our end of the season party.  This week starts the migration of the snowbirds.  For those of you from outside the U.S., people who leave the cold of the northern tier of the U.S. and those from Canada to travel to warmer winters are called snowbirds.   As soon as the snow it gone, these “birds” go back home to the North.  I’m one of them and my quilt guild is full of them.

I hope you’ll stop by tomorrow to see another technique to use when making a table topper.  These can be made any size depending on your table.  I have a small table so most of mine are around 12-16″.    Don’t forget to hop around to some of the other participating blogs and comment to win a give-away.

Always in stitches,

Marsha