Monthly Archives: September 2012

MOVING!

Hi readers.

I’ve moved!  My blog can now be found here .  The “facelift” I mentioned a week or so again became a move instead due to some technical glitches.  I hope you make your way over to the new blog.  Unfortunately, you will have to type your name in on the right hand column in order to receive notification of new posts from the new blog.  I hope you will do that.  I don’t want to lose any of you!!!


See you over at Quilter in Motion now located at http://quilterinmotion.net


Marsha

New Blog Address

The new blog address for QuilterinMotion is http://www. quilterinmotion.net .  You have been automatically directed to that new address.  It is necessary for you to sign in to receive notifications of new blog posts.  Thank you for your patience while we get things all back to normal.

Friday Finds

Are you ready for another wonderful day of fabulous finds?

I’ve found some unusual and some lovely tutorials for you.  Today I’m featuring

Bottlecap Trivet by Jos Country Junction

Woven Jelly Roll Rug by Jen at Quilting in the Rain

Freezer Paper piceing by dquilts

Sending candy in the mail by sometimescreative

One-seam Flying Geeese Block by thecraftyquilter

1.  Bottle Cap Trivet –  It’s simple, it’s lovely and oh, so useful.  The tutorial for this trivet using fabric and bottlecaps can be found here.

AccuquiltTrivet-1

2. Woven Jelly Roll Rug

Just seven steps and a Moda Jelly Roll pack (or cut your own) and you will have a rug.  You will find the tutorial here.

3. Freezer Paper Piecing Technique – Maybe this technique will make paper piecers out of some of you hold outs!  Check it out here.

4.  Sending Candy in the Mail – So maybe this is a little off-beat, but who wouldn’t like to receive “Hot Tamales” or “Black Crows” (for me) in the mail?  You can find out more about this here.

5.  One-seam Flying Geese Technique – I’ve seen a video of this before but these photo/writing instructions are so clear.  It might make a Flying Geese lover out of you!  You can find Julie’s tutorial here.

I hope you’ll check out the blogs that I feature here and also look around their blogs beyond that tutorial.  There’s some amazing stuff out there in Blogland and it never ceases to amaze me how creative we all can be…and maybe even a bit wild and wacky too.  Enjoy your travels to the blogs, leave them a comment and tell them you heard about the at http://quilterinmotion.com.  All bloggers like feedback so don’t be afraid to comment.  Just be nice–it’s not the place for nasty.

Happy Stitching

Marsha

Tidal Tote Bag

I was busy last week working on several projects but one that was prominent was the Tidal Tote Bag.  I had decided last month to make this tote for my daughter-in-law’s birthday.  Her birthday was in August but she and our son were out in California at a family reunion with her family.  They enjoyed their time in the Napa Valley –who wouldn’t?  Anyway, we didn’t see them until this past weekend while we were in Maine and I got to give her her gift.

I knew the Tidal Tote would be a hit with her because I’ve noticed she likes bags…she has all sizes.  I knew she like the ocean as much as I do…which  makes her the perfect daughter-in-law (along with how happy she has made our son).  I found the pattern when I went to visit Cotton Cupboard Quilt Shop in Bangor.  I bought one for a giveaway as well, and Sara from weddingdressblue was the winner and happy to receive her pattern and the Maine fabrics.

I couldn’t wait to use the gorgeous fabric I had purchased at Marden’s in Bangor.  It is lovely blues with sea horses anemones, fish and sea grasses.  It is a batik.

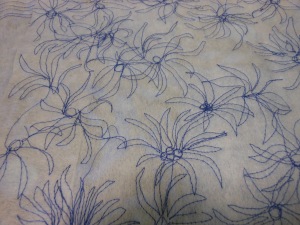
I had no trouble following the pattern by Poorhouse Quilt Designs.  I also enjoyed quilting the fabrics with my “Amenomes On the Loose”  free motion quilting design, made up as I went along.  This is the FMQ as it shows up on the batting.

The pattern comes with three choices of applique:  lobster, crab and sand dollar.  I decided to use the sand dollar and did an echo quilting on the front around the sand dollar.

Here’s the front side of the bag with the sand dollar.

Two fabrics are cut into squares and stitched together to make the font and then the sand dollar is appliqued on.  The the front is quilted.  The back is pieced the same way but no applique, and then is quilted.

There are two side pockets that are perfect for cell phones, etc.


There are two inner pockets the width of the fabric front with velcro closing.  I decided to use a lighthouse fabric remnant my cousin had given me.  This is Portland Headlight, a very familiar place to my family as we lived in Portland and the surrounds.

The handles and the bottom of the bag are made using Peltex for stiffener.  I love the way the handles feel “solid”, not flimsy, and will use this for more bag handles I’m sure.

A look inside the finished bag.


Really a nice tote, I would recommend this pattern for a smallish tote.  Here’s the web address for Poorhouse Quilt Design.  In fact, if you here, there’s even a free pattern available.

That’s it for today except I’m wondering if any of you are following the Dots to Dots Blog Hop?   I’m not participating as I have enough other projects right now and I’m getting ready (soon) for the “Leafs” Me Happy Blog Hop coming up October 1st.  Be sure to go over the check out what’s being done with fabric with dots.  There’s some lovely things out there.  You can find the listings here.

Until next time, happy stitching.

Marsha


A Visit to Dorr Mill Store

Not many miles from where we are located this summer is the Dorr Mill Store.  It’s an amazing collection of USA produced woolens, patterns for rug-hooking, needle-felting, punch needle embroidery, kits and ready-to-wear woolen clothing.  It is a amazing shop in Guild, New Hampshire and a wonderful place to visit.

Take a stroll with me through the aisles and just look at the variety of wonderful items they have for sale.

Just look at those colors!!!

So many aisles of bolts of wool.

Gorgeous samples

Projects, small and large

Some of my favorites – Matroyshka dolls.  I bought the wool to make one, knowing I had seen a pattern online and it was here.  It’s not exactly like the above one but close enough.

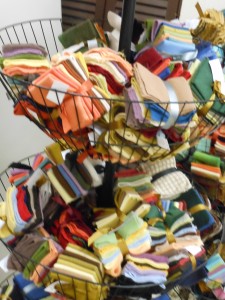
I bought some packs of smaller pieces of wool in a variety of colors like these.  These are all “washed wool” which means it has shrunk all it will, and won’t ravel according to the lady.  I had asked if she had wool felt and she looked horrified, then asked if I was going to use it for things like the dolls and the penny rugs and directed me to the washed wool.

What do I know?  I work in cotton mainly!

I chose these colors below

and these colors.

Those two bundles each hold eight pieces approximately 7″ x 8″.

I also bought a small package of some hand-dyed wool – expensive!!!  My friend, Brigitte, once told me that yellow wool is hard to find so I grabbed this packet with the yellow in it.

That package holds five colors, pink, yellow, green, blue and a lighter blue each about 11″ x 10″.

This next package was from a barrel of remnants.  $3.00 for all you could fit in the bag.  Needless to say, there were limited colors in the barrel, but I did try to get colors I thought might be useful.  I’m expecting to share these with my quilting friend, and Row Robin buddy, Brigitte as she does a LOT of wool applique.  She was kind enough to provide with all the pieces I need to do a Christmas wall-hanging of birds, berries and brances which I will be starting in the next few weeks.  I hope you’ll find something in my remnant bag that you can use, Brigitte!


I probably spent more money than I should have on the wool but I really do love the penny rugs and small wool projects I see here and there.  Look at this darling chickadee design.


So now I can add some wool projects to my list of things I want to make.  At least I have some materials to use when I get ready to do it and being this close to Dorr Mill Store made it seem like the right time to get it.

I hope you enjoyed this tour of Dorr Mill Store.  They do have the website I indicated at the beginning and they do mail-order.

Happy Stitching!

Marsha

Random Act of Kindness

I love making people happy!  I have to tell you a story about myself; kind of like “telling” on myself.  Several months ago I was involved in 2-3 swaps that all involved Cupcakes, and sewing blocks for the Red,White and Blue Blog Hop.  I had several cupcake ATC swaps going and a Cupcake Block swap all coming due around the same dates.  I completed all swaps on time-thanks to one lovely lady.

KBK, or Kimberly as I’ve come to know her, sent me a sweet message telling me she had received a cupcake ATC that she thought was very clever.

Well, I liked that praise — and then she went on to say she had then received a Red, White and Blue  Cupcake Block several days later.  Well, obviously I got a little concerned and went to check my spreadsheet.  Thank Goodness I had sense enough to keep a spreadsheet!!!!   Sure enough, I had sent the Red, White and Blue Cupcake Block to the wrong person!

Kimberly went on to say she’d really love to keep the block as she loved it but didn’t want me to “flake” on my Swap without realizing what had happened so she would send it back to me.   I replied that she deserved to keep it for saving me from disappointing someone else as I had time to make another one before the swap deadline.   I then asked her if she’d like to send it back to me so I could finishe it off for her as a small wallhanging since she’s not a quilter or sewist.

She was thrilled and sent it back to me.  Last week I put a border on the block and quilted it, then finished it off to send her.   Today I got a message from her saying she had received it and was so happy to own it.   I did admit to her I had thoughts , only for a second, of keeping it myself!  -;)

That’s Kimberly’s Cupcake Wallhanging.  I put a hanger on the back as I didn’t know exactly how she planned to use it.  I’m so happy that Kimberly’s happy!  It really was just a Random Act of Kindness; asking nothing in return, expecting nothing in return, just wanting to make someone’s day.  It’s a good feeling and I encourage everyone to try RAKs–they make the world go round.


I’m glad to be back and have all those errands done.  We did get a tiny bit of family time in and enjoyed seeing my brother’s new house.  It’s a beauty.  It’s waiting time to hear if all the tests, etc. went well but I’m expecting normal results.  I even snuck in a little Christmas shopping while waiting between errands.  It never hurts to get a headstart on that!

Tomorrow I think it will be time to share my trip to Dorr Woolen Store with you.  Come on by and see what I got!

Hugs, Marsha


Friday Finds AND a Recipe

I lost a day this week.  Did that ever happen to you?  I’ve got a “cold in my head” and just been going through each day only to find out it’s Thursday already.  It’s been a unique week here so that didn’t help me keep days straight.

We worked Tuesday which we usually don’t but 7 more cords of wood were delivered and needed to be stacked.  All hands on deck!  You’ve heard that saying, “Many hands make light work”.  Let me tell you wood is still heavy no matter how many hands are moving it but at least we had fewer pieces per person to move.  We had two Park workers from another State Park arrive to help, Ranger Eric and Assistant Ranger Nicole plus Jim, DH and me.   Seven people moved that wood a LOT faster!

Wednesday we traveled to state-wide end-0f-the-year event for the day.  It was nice and though we weren’t singled out for “Park of the Year”, we still feel like our park visitors enjoyed their time with us and in our heads we are Park of the Year.

Today is Thursday which means we are getting ready for the weekend, right?   Friday on this blog means “Friday Finds” which I will get right into, then I want to share a new family favorite recipe that is SO simple and SO delicious you might find yourself running right out to the grocery store!

My first “find” this week is these adorable crochet booties.  I know we’re a quilter’s blog but really we’re a people blog and people like to do various crafting things.  I’m busy this week knitting a sweater for the dear Grandson and I bet some of you are doing something similar.  I know a few of you have new additions to your family, or are waiting for them eagerly.  Maybe you’d like to be busy crocheting or knitting too.

1.  Crochet Mary Jane Booties


2.  Quilting Charts & Formulas

This site gives you charts for such wonderful things as the number of squares you can get from a fat quarter, how to figure how much fabric you need to make the backing for a quilt, or how to figure out the number of scallops needed for a quilt top.  It’s amazing and available free to download to your computer so you always have it with you!

3.  Amy Butler, who designs the most delicious fabric and delightful patterns, is giving away her “Love and Peace” Pattern.  She has other patterns too that she gives us for free. Be sure to check her site out.

4.  I know you like small projects to fill in those time you just don’t want to work on something big.  I get it.  I have those days too–lots of them!

Check out this lovely Framed Friendship Star block.  It’s beautiful and would make a lovely mini-quilt all by itself or could be done many times  quiltt.

to make an awesome quilt.  About.com has the most incredible tutorials on making various blocks.  Their instructional drawings and photos make it a snap.

https://i0.wp.com/0.tqn.com/d/quilting/1/0/N/g/-/-/framed-friendship.jpg

5.  Sun Printing – The Basics by The Quilted Rat blog.  You have to go here even if you think you never want to dye or print fabric.  Her work is incredible!!!  Sun-printing looks quite easy and when you add thread painting, as The Quilt Rat does, it’s amazing.

I can’t show you a photo of one of her images because she specifically asks that people don’t but trust me when I tell you to go over there and browse for a bit.  She is one talented Canadian, and I’d love to get my hands on the Autumn issue of Canadian Quilter magazine for her Pumpkin pattern.  It is the most artistic rendition of a pumpkin, all in thread-painting, I’ve ever seen.  She does so many things so well!

That’s it for my Friday Finds.  Now to the fantastic recipe I promised.

Last weekend, Labor Day Weekend, we were given some fresh veggies, including some fresh basil.  I immediately thought about a lovely shrimp appetizer my brother had made for us back in the Spring.

Bacon Wrapped Shrimp

You will need large shrimp, fresh or frozen; fresh basil leaves, bacon and skewers.

Soak the skewers in water before using them.  This keeps the skewers from burning while the shrimp and bacon cook.

Defrost your shrimp if you bought a package of frozen as I did.  I bought a package that  said 16-20 pieces.  There were actually 19 pieces in the package which for 5 people was just perfect.  The shrimp I bought had the heads of but I had to twist off the tails, then peel off the think shell.  This is done quite easily.

Once washed and ready, skewer one shrimp on the wooden skewer, lengthwise.

Wrap one basil leaf around the shrimp.

Wrap a half-slice of bacon around the entire shrimp/basil “package”.

Then place on a heated grill, on the lower temperature area.

Cook approximately 4 minutes on each side, turning frequently after that.  You want the bacon to be cooked brown and slightly crisply, about 2 more minutes or until bacon looks cooked.

Don’t overcook as the shrimp will be cooked before the shrimp.

Incredibly Good Eats!!!


That’s it for a few days, friends.  We are off to Maine for various necessary tasks, like dr. visits, new licenses before we head South, absentee ballot, etc. and I’ll won’t be blogging for that time.  Hopefully I’ll be seeing you all on Wednesday!

Keep yourselves busy!  Marsha


Salvaging Selvages

Hi all.  Apparently this “facelift” isn’t going to happen right off.  SIL told me last night it could take up to a week before we can move forward so I’m going to post until told to stop by SIL.  It will happen, just not immediately.  He’s jumping through all the hoops; I’m just waiting.  😉


Salvaging Selvages

Salvage:  (verb) “saving possessions from being lost”; rescuing from destruction

Selvage:  Wikipedia says the selvage is is the term for the self-finished edges of fabric. The selvages keep the fabric from unraveling or fraying.   The selvages are a result of how the fabric is created. In woven fabric, selvages are the edges that run parallel to the warp (the longitudinal threads that run the entire length of the fabric), and are created by the weft thread looping back at the end of each row.

Did you also know that selvages can also give you information about the manufacturer, designer and even the various colors included in a fabric?  Those lovely little dots can help you choose coordinating fabrics once you’ve selected a focus fabric.


These are some of the selvages that my cousin, Nina, let me cut from her fabrics.  She doesn’t use them and so generously let me go through her tubs of fabric and trim off the selvages.  It was very exciting to have these to add to my growing collection of selvages!

More selvages!

And more selvages!

I was disappointed to miss out on a swap, actually a gallon-sized bag of selvages, just by days!   I would l0ve to have had a chance to win those!!!  The gal said she will be cutting more fabric in the weeks ahead (won’t we all, we hope?) and will perhaps do it again.

When I go for fat quarters at shops where they will cut a FQ for you from yardage, I always ask for the piece that has the selvage edge as I’ve noticed most shop-keepers will try to give you the other FQ without the selvage.  Remember that if you keep selvages and if you don’t, I’m not going to try to talk you in to it.  People either like the looks of selvages pieced or they don’t.  I do!   If you ever want to get rid of any, I’m your gal!!

Here’s the whole stack Nina gave me.  What a windfall!

I’ve only made a few bags with selvages so far, and a eye glass case but I’m looking forward to using more of these now that I have a better supply.  Thanks, Nina!

Tomorrow, stop by and I’ll give you a new recipe.

Marsha

Winners!

Yes, I think we could say the Back-to-School Blog Hop was a huge success!   I had lots of very nice people stop by and a good number of comments.  Obviously if people didn’t want one of the patterns, they didn’t take the time to stop and comment usually but that’s okay.  I visited lots of blogs too, and didn’t leave comments at all of them.  Sometimes because I didn’t have time right then to fill out the comment form, sometimes because the Comment box wouldn’t accept my comment.

Anyway,  we did get winners and I have to explain how I get to the winners.  It’s time-consuming and should be easier to do, but I don’t have any of the new-fangled things like Rafflecopter, and Random Number Generator.  It’s just little ol’ me and the man with the big hands.  I take all the numbers and toss them in a bag or hat.  Then I ask the man with the big hands to grab two numbers.  It works; I know it’s a bit out-dated mode of doing things but it does get us to the winners.

I want to thank everyone who stopped by, and especially those who decided they like my blog enough to come back, and to Follow.  One thing about following, one gal said she couldn’t “follow” because she didn’t belong to Linky.  No one has to be a member of Linky to follow here.  Right under the Linky box, if you keep on scrolling, is the Follow Me box and under it, it says Click Here.  That’s where you want to be if you want to follow the blog.  Hope that didn’t create too much confusion for people.

Have I rambled too much?  Are you anxious to hear who won?  Okay, here are the two lucky winners.  A big thank you to BOTH of you for taking these patterns off my hands, giving me a bit more space and I hope you enjoy them.  Each winner is going to get 5 or 6 patterns, including the one they noted they wanted.  Luckily, both of our winners wanted different patterns!

Receiving “Log Cabin Hearts”  plus others  is Alessandra is from Italy and operates the blog  Il Miracolo Dei Fili    I’m excited because I won one of Alessandra’s giveaways last winter!  I hope you enjoy the patterns, Alessandra!

Receiving “In Grandma’s Garden” and others is Mary W at 1Piece 2 Mary blog     Mary had the most incredible Halloween bowls during the Bowls with Borders Blog Hop.  It was just fun!!!!  Enjoy the paper piecing, Mary!

I am happy that these two lovely ladies won.  I’ve been visiting both their blogs and they each have things that you will enjoy.  Alessandra has some delicious looking cake recipes over there! Jocelyn loves flowers as you’ll see if you go to her blog today.  Her photos are great and all I can say is it must be a great year for zinnias and cosmos as we have lots of them blooming right now too.   I’ll be emailing you both, Allesandra and Mary, to get your addresses.  Alexxandra, I do have yours but can’t put my fingers on it right now so will need you to send it again.  Thanks.

Let’s give the winners a big round of applause.

English: Crowd applause taken at the Liverpool...

Now for more news.  I’m getting a facelift!   Well, not ME but my blog is getting a facelift.  We’ll be working on it for a day or two so there won’t be a new post until probably Thursday or Friday.  I hope you’ll come by then to see what’s new.  I’ve been saving a few things to share with you until after the Blog Hop and now it will be after the Facelift!  My “technical advisor”, favorite SIL, promises me there’ll be benefits to this move so I’m ready.  See you in a few days!

Marsha

Dresden Daz-y Needlecase/Pincushion Tutorial

I hope you enjoyed the School Days Blog Hop.  Today is the final day and tomorrow children return to school and families get into their routine of lunchboxes, homework, and perhaps a little more free time for stay-at-home moms.  It’s also your final chance to leave comments on the participating blogs and try to win a wonderful giveaway!  Look back to yesterday’s post if this is your first time here to see what I’m giving away and to find the list of participating bloggers.

I thought you might be looking for something to do (hah!  What quilter doesn’t have a dozen projects -at least – waiting for the time to do them!)  so I thought today would be a good day for a tutorial.

Several weeks ago I agreed to participate in a needle case swap with the ladies in the “Crazy About Pincushions” Yahoo Group.  They are a nice group of people interested in all things pinnie related:  pincushions, needlecases, patterns and such.  They share patterns they’ve found on the Internet for making pincushions from the ordinary to the unusual.  There is an amazing number of pincushions and pincushion patterns out there.  I have one whole board dedicated to pincushions.  You can find my page under Marsha Hodgkins or QuilterinMotion.  Feel free to “pin” my pincushions on YOUR board, giving the link to my blog please.

I decided to create a new needlecase, one that hopefully my swap partner would not have seen before.  Now that I know she’s received her package I can share it with you.
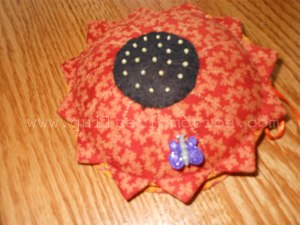
I got the idea from Jennifer at Elephantz website where she talked about reusing a CD to make a needlecase. That’s where I got the idea of a needlecase and elaborated a bit to include a pincushion on top.  Jennifer’s is a lovely embroidery as that’s her specialty.

I loved Dresden Plate patterns so I thought this would be a chance to put a dresden plate on a needlecase.  The orange pinkeep is one I made using Jennifer’s method with old CDs.  I didn’t like the  larger size or the unforgiving stiffness of the CD so decided to go with Peltex, the stiff interfacing used for bowls, etc.  The yellow pinkeep you’ll see further on is my second attempt, done a bit differently with the Peltex.

You need Peltex remnants cut into a circle the size you wish your needlecase to be.  I just traced around the rim of a coffee cup to get my circle.   You need six fabric circles.  You need two Peltex inserts.  You also need 2 circles of batting and fabrics of your choice.  Add seam allowance to the fabrics only.

Necessary pieces

You probably have a Dresden Plate pattern.  I traced my circle of Peltex onto paper, then folded it in half, then half again until the sections were the width I thought would work for the Dresden Plate top.  I added the 1/4″ seam allowance all around and laid my pattern piece on the fabrics, cutting the same number as I had sections on my folded paper circle, eight for my smaller yellow Dresden Daz-y, twelve for the larger on the CD.

Then I stitched the sections, the “petals”, just like you do all Dresden plate sections, folding the long side together and stitching across the end.  Clip the point.
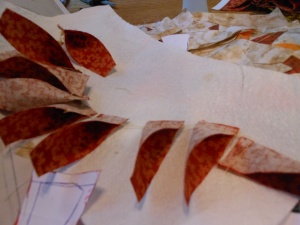
Turn them right sides out and press carefully, making sure you have the piece centered so you get a nice even point.

Stitch the eight petals together, making the “plate”.

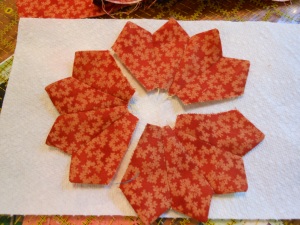
Set that aside. Lay a circle of fabric over the circle of Peltex and press the edges in. Do this with two circles of Peltex.  Hint:  There is a fusible Peltex, one-sided or two-sided that helps to keep those edges in place.  Lay each circle over a circle and press the edges in toward the center.  You have six circles, two can be fused to the Peltex if you are using that.
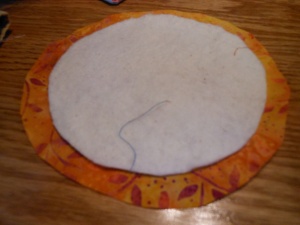
Fold two of the circles in half and lay on top of the two circles you have not used yet.  Stitch around the raw edges about 1/8″.  These will be pockets.  I stitched down the center of one pocket, creating two smaller pockets for one side and left the second pocket full size.  (This photo shows one I did with a contrasting trim.  Press the edges over the batting to get the correct shape.

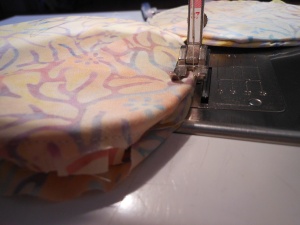
Place your circles together as your  completed circle will look (see behind the sewing machine foot).

Stitch through the two layers almost all the way around, leaving about a 2″ opening.  Don’t worry if your edges have little points where they were folded or are slightly uneven.  A final zigzag around the edge when the piece is all together will cover those minor things.
You will need a connecting piece to attach the two circles together.  Cut a 2″ by 3″ rectangle from matching fabric. With right sides together, stitch the long edges and turn right side out.  Press and slip the rectangle into the opening you left in the circle.  Continue stitching.  The pocket is hard to see below but it is there.

Once you have both sides done, it is time to attach the Dresden Daz-y.  Pin the Dreden Daz-y you made earlier to the top of the needlecase. Hand-stitch the D.Daz-y to the top of the needlecase with small stitches on the underside of each petal, leaving the petal end free as you can see below.

You could stitch it by machine onto the top fabric circle before you stitch the circle to the other batting/fabric circle.  Hand-stitching as shown above leaves the flower looking like it’s just sitting atop the needlecase.

Once it’s stitched in place, fold the points up and keep that way with a bit of painter’s tape which will not leave any residue on your fabric.

Here you can see I did the stitching down before I sewed the top to the batting/fabric.  Using your machine, stitch through the layers around the edge of the circle. Leave an opening for the other end of the rectangle connecting piece, insert it and keep stitching around the remaining unstitched area.  Cut two circles slightly smaller than the original circles from felt or batting.  If you fold your felt and cut out your circles, you can include a small “connector” between the circles.  Attach the connector with a few stitches to the farbic connector.

Inside of needle case

Tie on ribble ties if desired.  Now it is time to complete the pincushion.  Using the opening in the Dresden Daz-y, stuff small amounts of stuffing into the flower causing it to plump up.  Stuff as much as you feel it will comfortably hold and firmly enough that pins will stand up in the pincushion.

Cut a circle of brown/black felt large enough to cover the hole in the top of the Daz-y.  Stitch it in place and add some beads if you like.  If you have any questions, feel free to email me or ask in a comment.  I try to reply to EVERY comment so I will read yours and reply.

The finished Dresden Daz-y Needlecase and Pincushion


Here’s the inspiration for this yellow Dresden Daz-y.  The first one was orange because my Swap Partner likes orange.

Heliopsis

These heliopsis are in full bloom in the front garden here at the park.  They are towering over even the purple coneflowers at about 5 1/2 feet.  They bloom about the second week in August each year and stay in bloom for close to two months.  Butterflies love them, and I would only caution if you like these enough to grow them, they tend to take over so must be reined in constantly.  If I hadn’t been pulling them out each season, they would cover the entire front garden by now.  I drew a line in the sand if you will, of how far I was willing to let them spread and I pull out everything beyond that point.  They are glorious in bloom and a sure eye-catcher!


Here’s wishing for more Summer-y days and that you will have a little piece of summer to carry you through the winter with these Dresden Daz-ies.   Winners of the giveaway will be announced Tuesday morning.  Emails will be sent to the two winners if the email address is available.  Check back here if you don’t see an email from me in your box!

Happy Stitching!   Marsha