Tag Archives: Carol Doak

Artisans Abound

You never have to look very far to find talent.  Talent comes in many forms.  I blog about quilting, mainly, but if you’ve read my blog for long you know I have an appreciation for all kinds of talent and enjoy looking at the end results of these talents.

I apologize in advance for the location of photos in relation to text herein.  I seem to be having a problem that I can’t resolve but I’ll keep on trying.  Photos and text are changing their location when I close up the post.   I’m hoping my SIL can figure out what’s happening and we can resolve the issue soon.

Today I’m going to share some photos of products from talented artisans.  Unfortunately, I won’t be able to credit each and every one as I took photos in various places and didn’t get names, etc.  In some situations, it is very difficult to find the name of the creator.  I pride myself in making an attempt to find, and credit, the original designer whenever possible so I apologize to anyone whose name might be left off their product herein.

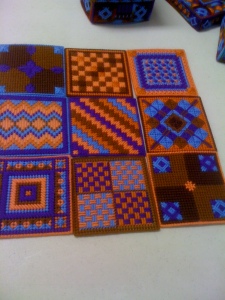
First off, I’m am so happy to introduce you to the wonderful worksof Diane Melde.  Diane was in our park visiting a quilting friend and blog follower, Linda.  She came with Linda yesterday to our quilt group to share some of her work.  Diane works in plastic canvas — and before you say “ho hum”, take the time to look at the wonderful designs Diane creates. This is not your grandma’s plastic canvas!

Earring holder, wall-mount

Bottom of box, "filled with love"

"Love" box exterior and cover

Coasters made as quilt blocks

Kitty sits atops a box designed to hold a C-Pap machine

These designs are all originals, by Diane Melde.  The designs remind me of some European designs and are incredibly complex.  Diane gave me permission to share these photos with you and I’m happy to give you a link to her website where I bet you will find more beautiful items.  Thanks for bringing your friend by, Linda.  Now she’s a friend of all the quilters and we will be looking forward to her “teaching” visit in 2013-14.

Along with Candy, another quilting buddy and blog follower, I went to the annual Fairhope, AL Arts and Crafts Fair.  Fairhope is a city known for its love of art.  They also have fantastic shops, especially the bookstore Page and Palette, and The Village Peddler, antiques.

They have monthly Friday night Art Walks to the various galleries located there and every March they hold this amazing three-day arts and crafts festival that fills the center streets of the city.   It’s truly amazing and artists come from all over the U.S. to show (and hopefully sell) their art.  I thought today would be a good day to share some of the things I saw.

There are some lovely buildings there as well.

This fabric arrived on my “doorstep” yesterday.  It’s a gift from Carol Doak, the well-known paper-piecing/fabric designer.  Carol did a random drawing from the completed basket projects in our Yahoo group and I was the winner.  Isn’t it lovely?  It’s very special to me because Carol designed this fabric.  As you know, I’m doing a blue/white quilt for my Row Robin quilt so this may become the backing.

It’s a beautiful Spring day here in Summerdale, Alabama and I’ve had an enjoyable day with three friends visiting Fairhope again.  I think we went into every single shop there and had a lovely lunch.  I had to make the trip over there to buy a replacement for the bobbin cover I lost transporting my Janome to/from the Clubhouse.   I looked all over the parking lot and Clubhouse for it yesterday afternoon.

Then we get back and what do I get handed to me?  You guessed it!   The bobbin cover I lost.  It was in the street right at the end of the property where our friends dropped us off yesterday.  Apparently it fell off the machine when I was taking it out of the truck.  The neighbor walked across to visit over here with the guys and found it in the street.   Why, oh why, couldn’t it have been found yesterday and saved me $10.   Murphy’s Law and all, I guess.  Anyway, now I have a spare!  Clear plastic is sure to disappear again.

Happy sewing everyone.

Marsha

Taking the Mystery out of Paper Piecing

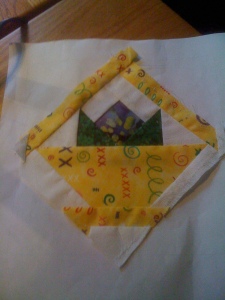
Paper Pieced Basket Blocks

I showed you these blocks the other day but I thought some of you might like to see how a “paper-pieced” block goes together.  This particular 7″ block is a design by Carol Doak.  Carol has been designing paper-pieced projects for many years and has a number of books available with designs and instructions.  She has a website store where she sells her products and also posts free paper-piecing designs on a fairly regular basis.   Carol is a New Englander, from New Hampshire as well as the motivating force behind a Yahoo! group I belong to.  It’s a free site and you can join if you like paper-piecing.  Every so often there will be a challenge or a swap with the main rule that you must use a Carol Doak design in the challenge or swap.

This particular basket block swap told us exactly what block to use and also that we had to use black on white or white on black in specific locations as well as white in specific locations.  This assures that wherever your four blocks come from they will “go together” due to the white/black fabrics.

So, here we go.  This really isn’t a tutorial, more just a photo step by step of how my basket block went together.  One must follow the numbers on a piece of paper.

The foundation of the paper pieced basket block

The numbering on the block is done to assure that as each piece of fabric is placed the raw edges will be covered and the design will emerge.

You can see #1 is that on-point diamond in the middle upper quadrant.  It represents the flower in the basket.

My flower fabric

This #1 fabric gets held wrong side of fabric against the back of the paper, covering the area marked with the diamond.  The #2 fabric is held with the right side of fabric against the right side of the diamond so that the raw edge is against the edge of #2 on the paper design.

Fabric #2 held right sides together against Fabric #1

These two pieces of fabric are on the BACK SIDE of the printed design so essentially you are sewing upside down and backward.  You do your stitching along the line joining #1 and #2 on the front printed side of the paper and you stitch right through the paper following the line.  You extend your stitches a few stitches on either side of the line.

Fabric #1 is now joined with Fabric #2 along the joint seam and then pressed open.  These fabric pieces are slightly larger than the actual shape on the paper so to be sure to cover the shape.  Trimming is done as each seam is pressed open so that you have 1/4″ or less of fabric behind the pieces.

Fabric #2 added (white)

I think you can see the white patterned fabric #3  has been added to fabrics #1 and #2 along the joint line on the paper pattern in the same reverse way as the others.  Another raw edge of fabric #1 (and also #2) has been covered.

Adding fabric #4, a leaf

As you can see, we are working around the very first fabric (yellow), enclosing it with other fabrics.  Fabric #4 is one of the leaves.

Fabric #5, another leaf

Fabric #1, yellow flower, is now enclosed on all four sides-no raw edges show anynmore.  The second leaf, Fabric #5 has been added.

Now I’ll confess right here that it isn’t always so easy to place these fabrics.  Working on the reverse side of the fabric you can can confused about the direction the fabric will be facing when pressed flat.  This is like working upside down and wrong side out.  I usually use a piece of fabric a little larger than the actual size needed and trim after I have it in place.  I hold the paper up to an open window or light and I can see, fairly well, through the paper to see that the fabric is going to cover the size of the space needed and usually if I have it positioned right.

Sometimes it doesn’t come out positioned quite right so you take out the seam and place it again.  These are all small pieces so there are usually only a very few stitches to take out.
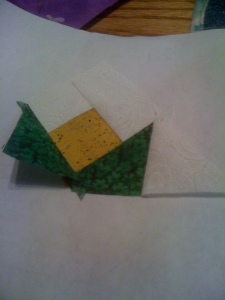
White background piece #6

Here as I add #6 we are covering a raw edge of the leaf.  It’s almost liking working around the center as we cover each edge and add the adjoining fabric.

Fabric #7 enclosed the final upper edge of the flower/leaf area.  Each piece as it’s added it opened and pressed before adding the next piece.  It’s vital to know that the piece you just stitched down is covering its alloted area.

Ah, the body of the basket

Now we’re talking!  We’re adding the body of the basket, #8, to the flower portion.  This hasn’t been pressed down yet as you can see by the curling edge.

Fabric #9

Fabric #8 was trimmed to fit its space and fabric #9 is added to give shape to the basket edge.

Fabric #10 defines the other side of the basket, on the left.

Fabric #11

Fabric #11 has been added to give the basket a base.  Here it hasn’t been pressed and the trimming doesn’t get done until # 12 is stitched to it.

More fabric to distinguish the base from the background

Fabric #12 is added below the base.  You can see on the right side of the fabric #12 where the excess  base fabric extends down.  Now that #12 has been added, I can flip that white back over and trim the two seams together about a scant 1/4″.

Step #13

Next we’re moving up to the top and adding a basket handle to the piece. Fabric #13 is the right handle.

Another handle

Fabric #14 is the second handle.  See how precisely the points of the leaves are shown, and the points on the edge of the basket.  This isn’t a matter of expertise on the part of the stitcher; it’s the outcome of stitching on the lines designated.  Even a beginner will have those same precise points.

Tiny pieces can make a big difference

Can you find fabric #15?  I gave you a hint.  It’s a tiny piece.  Okay, I’ll tell you.  It’s on the left side at the edge where the basket meets the handle, a tiny triangle.  Sometimes these tiny pieces are what it takes to give an accurate shape to your subject.

Another tiny piece

There is an identical little triangle on the right side of the basket handle, #16.  #16 hasn’t been trimmed yet so it looks larger but it’s not, or it won’t be once we add the borders.

First border section

We’re close to the finish line now.  We’re adding fabric #17, the first border section which was designated to be white on black or black on white fabric. Here I haven’t press it open yet so you can see the paper peeking out.

There it is, #17 pressed open.

I’ll tell you a secret right now.  When I was making basket #3, I was sailing along, feeling confident.  I had made two others, right?  I knew how it went together, right?   Wrong!  I got all the way to the end, to the very last border section when I looked at the front and saw a hole–a place where raw edges were still visible–!!!  I had skipped one number so I had to rip out all the steps between the one I missed and the one I was currently on, the last step.   Then added the missing piece and stitched the others all back together.  Yes, it took more time but it wasn’t the end of the world.  Everything looked precisely as it should at the end of the block and you never would have known if I hadn’t told you!!  We all can make mistakes, and we all can correct them.  We should never let the possibility of an error keep us from trying something.

Next....

And so it goes as we finish the block on the other two sides.  Why I didn’t take a shot of these last two steps, I have no idea!  Maybe it was getting late and my brain was getting fuzzy.

Completed block…19 little pieces of fabric to make a 7″ block but it has precise points I wouldn’t get any other way, and it’s so much fun to build the block and see the design emerge.

There are paper piecing designs for beginners and paper piecing designs for advanced.  Pick your poison!

Update

Quilter’s Hoodie No More

Yes, that’s right.  I can’t call my project a Quilter’s Hoodie any more.  I decided not to add a hoodie, but went for a collar instead so I can show off the paper piecing I did across the yoke section.   Yesterday, I was able to finish the quilting on the individual pieces, thanks to the co-operation of Bernie (my Bernina).  I thought if I gave her a nickname, she might cooperate better.  I guess it worked.

I washed the fabric sections at Pat’s while the tractor guys and their wives were having a lunch time cook-out which saved me from an hour at the laundromat.  Most sections crinkled up just the way I wanted.  The back didn’t.  I think it’s because there were bigger spaces between the quilting on the back but that’s fine.  No one can look at the front and the back at the same time, right?

During the night last night, I woke up thinking about my jacket and if it had shrunk too much, too little or just right.  So, at 3 a.m. I was up pinning the pattern pieces to the laundered sections to assure myself it was all right and I could go back to sleep.  Do you ever do things like that?  I knew I would lay there and obsess about it until it was a decent hour to get up, or I could get up, check it out and go back to bed.

I went back to bed at 4 a.m. with the pieces all cut out and ready to stitch.   I’m pleased with it so far.  Quilter’s jacket, not quilter’s hoodie.  My next one will be a hoodie for sure, and yes, even though it requires a great deal of work and time allotment, I will be making more.

That’s it for today, friends.  I’m off to have a nice breakfast with DH and then probably some grocery shopping and back to work on my February swap project.  That’s about the only thing I have left on my Priority List.  My bucket list is in the background just waiting for me to start working on it.  Maybe in March!

Hugs to all.  Marsha


Monday Mix

Happy Monday.

I hope you are enjoying today.  I’ve had such a fun day.  It started early with line dancing at 8 a.m.   It was a typical line dancing session, but we danced to a great song (not sure of the name) but it was faster than usual and the steps fit so nicely.  We sure had to move to keep up with the music but it was fun!

Then back in the RV for a few hours and I decided to start work on the four paper-pieced basket blocks I’m doing with the Carol Doak Yahoo Group.  We will each make the same basket with some of the same colors, then send them along to the facilitator who will divvy them up and send them along to the swappers.  I have plenty of time to make them up but decided this morning to see how they went together.  I thought I could get all four done in about an hour which is all the time I had this morning to do them.  NOT!

There are certain requirements for all the blocks to keep them similar and able to mix together with whatever other basket blocks you receive.  One thing is they all have to be made with certain areas white, certain areas green, certain areas must have a black on white or white on black.  I got the first block done and put on the black/white fabric.  I took off the black/white fabric.

Basket #1 less the four outher triangles

The black/white fabric I had was striped and I didn’t like the stripes going one way here and a different way there so I took them off.  I decided to begin on block #2 and got all the way through the first 11 pieces when I realized I had sewn a white piece down and didn’t notice it didn’t fit correctly.  Against the white paper background, it didn’t really show until I looked closely.  Here’s what block #2 looks like now.

Like peeling an onion

I had to take off piece by piece all that I had done back to the third piece placed.  You can see all the stitching lines and all the pieces I took off.  In case this sounds confusing to you, I’ll explain a little bit.  Paper-piecing is done using a piece of paper with the design printed on it, and the design is number in the order you should stitch the fabric pieces down.

The paper "foundation"

It’s also called “foundation piecing” as you stitch right onto the foundation, the numbered pattern.  Paper-piecing is a way to get very small pieces of fabric stitched on accurately.  Otherwise some would be too small to even turn the seam allowance.  Notice #15 and 16.  They are those tiny triangles at the left and right edge where the diamond points are.  Too small to ever turn seam allowances and stitch to another piece but paper-piecing makes it happen perfectly.

Did you also notice there’s no fabric showing on the pattern?  That’s because you work with the fabric behind the paper.  It gets a little tricky now and then placing the fabric pieces where you want them so that once stitched you and flip them and they will cover the assigned area.  If they aren’t, RIP.  It’s almost inevitable that at least one piece will need to be taken off and replaced to get it to cover correctly.

I always tell people you either love paper piecing or you hate paper piecing but you should give it a try as there are some designs you’ll never be able to get otherwise.

Here’s the same block #2 from the other side of the paper.  See what sharp edges you can get (where pink meets green and green meets white).  I’ll keep working on them now and then and will share the progress with you.  I did get to a fabric store this afternoon where I picked up some black on white fabric that will much better for the four corners.

S.E.A. Quilt Shop

Doesn’t look much like a quilt shop, does it!  The first time I followed the signage to this shop, I was sure I had made a wrong turn somewhere.  It’s actually in the lower floor of this home, under that overhang.  Not very attractive, but the shop has some nice fabric in it.  I think the owner is hanging on by a thread and our quilt guild is trying to support her so we won’t lose our only real fabric store, but I don’t know how well it’s working.

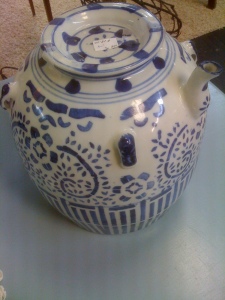
Once we left the quilt shop, each of us with a few purchases in hand, we made our way to a few thrift shops.  Two were closed on Mondays so we will just have to take another jaunt out to check them out, and the other two were open.   We went into the small mall where the shop was and saw a sign for a shop called, “Just Stuff”.  Now how could you pass that up?   We went in and found the loveliest little shop with the sweetest, most gentle Southern lady running it.  She was such a welcoming person and her shop was restful and just relaxing to poke around it.  Everything was neat as a pin, and it was set up like a small cottage with each area having a designation as a room by the items found in it.  Here’s something I wanted to buy because I fell in love with it right away.

Remember, however, that I live in an RV.  I couldn’t figure out how I could keep it safe while traveling as it’s not small.  The price was so low ($18.00) and it was sound and just so neat.  Maybe I could gift it to my daughter?

Anyway, we were looking at everything and especially small things.  As you know from a previous reading, I’ve been picking up small items that I think would make a cute pincushion, and I’ve been looking for an antique pincushion.  I think I found one, maybe not a terribly valuable one but old.

Bird on a Branch Pincushion

Actually I found two other items but mentioned to the lady what I was going to do with them and that I have a think these days for pincushions.  She went over to a high shelf and came back with this bird on a branch pincushion.  Isn’t it awesome?   There was no price so I asked her for the price, wishing it could be a price I’d feel I could spend.   She gave it to me.  I mean she wouldn’t give me a price and said she just wants to make people happy so I would have to take it.  I was so amazed at her generosity but she pointed to a picture hanging on the wall and said He brings me happiness and I give it to others.  She was pointing at a picture of Jesus she had above the cash register.

I’m thrilled to have the birdie pincushion; it’s small and unique.  Here’s the two other items I had in my hand at the time she showed me the bird.

High Heel

Isn’t this darling?  It’s not an antique but in the fashion of Victorian pincushions that were often made from ceramic or porcelain shoes, it will be perfect for a pincushion.  And here’s the other one:

Another shoe

The two shoes were $3.00 each.  Sew worth it!!  I bought the polka-dotted shoe and offered the other one to my shopping companion, Anita.  She was only too happy to have a shoe also.

Here’s another item she had in her shop, an old chair with a pieced seat cover.   I thought you quilters would enjoy that.

I also got a pretty blue shirt with some embroider on it that I thought I’d take apart as sections for my next Quilter’s Hoodie which will probably be blue, but when I got home and tried it on, it fits me so I’m going to get some wear out of it in its current form before I change it into something else.

I bought my fabric for the February Swap at the quilt guild.  I can’t tell you what I’m making but the theme is “Conversation Heart” and the participants can make anything they want to as long as it has a heart somewhere on it, and they can make it from anything, not necessary a quilted heart.  That should be fun to see.   The fabric I bought is a gorgeous hand-dyed dusty pink.  You see it in its finished form after the Conversation Heart Swap Feb. 14th.  Nice that our meeting falls on Valentine’s Day, isn’t it.

That does it for my shopping adventure.  It’s sure fun to spend an afternoon with a good friend, just visiting shops and not necessarily spending a fortune.  Of course we were both dragging a bit when we got done because we had done an hour of active cardio workout at water aerobics before we went shopping!

It sure will be nice to fall into bed tonight.  Tomorrow is Quilter’s Hoodie day again so I’ll let you know how much progress I make in that area.

Thank you for visiting.  I love your comments and would love to hear from more of you readers. According to my charts supplied by WordPress, I have about 56 people who have signed up to receive an automatic email whenever I post a new post and I have another 50 or so that check in regularly.   I’d love to hear from some of you.  I know a lot of you are shy, but I do get emails and comments from others who don’t write comments.  I appreciate the time you spend here with me today.  God bless.

Marsha